期望能探索出一套比较优的解决方案实现和剪映差不多的贴纸绘制方案,能够实现无损缩放,并且缩放时不卡顿,似乎内存占用也不是很高(不确定)。
Native 实现文字贴纸的基本原理:用户输入 、排版&创建图片、渲染到视频上。 如何接受用户输入以及渲染图片到视频上不属于这篇文章讨论的范畴,本文主要介绍的中心在如何将文字绘制成一张张位图
本文对应代码
排版&创建图片 iOS 实现排版方式有很多,虽然最底层原理都是 CoreText,但是根据场景不同具体的实践方案,因为不同Framework封装度不同,具体的使用也会有所不同。
方案
优点
缺点
UIKit:UITextView、UILabel、NSString(NSAttributedString……)
封装比较好,实现代码少
需要在主线程访问,无法灵活调整文字排版
QuartzCore:CATextLayer
封装比较好,实现代码少
无法获取文字排版结果、调整排版不灵活
TextKit:NSLayoutManager……
封装度一般,代码略多,能结合 UITextView 一起使用
学习成本比较大
CoreText:CTFramesetter……
需要自行封装,代码量最多
学习成本比较大
UIKit 这一套方案最简单,可以通过调用 sizeToFit 来实现计算文字所需占用的 Rect
绘制的方式很简单,直接调用 UIKit 的 [UIView drawViewHierarchyInRect:afterScreenUpdates:就能将已经在屏幕中绘制过的 UIView 组件绘制在当前 context 中,得到 UIImage
因为使用的 UIKit,严重依赖主线程,做视频的编辑相关需求时极有可能成为瓶颈
1
2
3
4
5
- (UIImage *)image { UIGraphicsBeginImageContextWithOptions(self.textView.bounds.size, NO, [UIScreen mainScreen].scale); [self.textView drawViewHierarchyInRect:self.textView.bounds afterScreenUpdates:NO]; return UIGraphicsGetImageFromCurrentImageContext(); }
QuartzCore CATextLayer 简介
A layer that provides simple text layout and rendering of plain or attributed strings.
CATextLayer disables sub-pixel antialiasing when rendering text. Text can only be drawn using sub-pixel antialiasing when it is composited into an existing opaque background at the same time that it’s rasterized. There is no way to draw text with sub-pixel antialiasing by itself, whether into an image or a layer, in advance of having the background pixels to weave the text pixels into. Setting the opacity property of the layer to true does not change the rendering mode.
关于sub-pixel antialiasing 相关的问题,在 How to get text in a CATextLayer to be clear 上可以获得解答。
需要注意的是,如果你需要让 CATextLayer 使用 sub-pixel antialiasing ,需要做两件事情
设置 contentScale,以保证 retina 屏幕下能够足够清晰
重写继承 CATextLayer 并且重写drawInContext
1
2
3
4
5
6
7
8
9
10
11
12
13
14
15
16
17
+ (TextActionLayer*) layer { TextActionLayer *layer = [[TextActionLayer alloc] init]; layer.opaque = TRUE; CGFloat scale = [[UIScreen mainScreen] scale]; layer.contentsScale = scale; return [layer autorelease]; } // Render after enabling with anti aliasing for text - (void)drawInContext:(CGContextRef)ctx { CGRect bounds = self.bounds; CGContextSetFillColorWithColor(ctx, self.backgroundColor); CGContextFillRect(ctx, bounds); CGContextSetShouldSmoothFonts(ctx, TRUE); [super drawInContext:ctx]; }
言归正传,这套方案只适用于已知文字排版结果的前提下比较有效(在指定矩形区域内对文字进行排版并且渲染)
因为 CATextLayer 似乎没有并没有实现 preferredFrameSize,这也就意味着在已知宽度的情况下,它不会帮你计算应该需要多少高度。因此需要借助其他代码来实现 frame 的计算。
使用的过程中记得设置 textLayer.wrapped = YES; 否则你的文字不会换行。
宽高的计算可以利用 boundingRectWithSize ,代码如下:
1
2
3
4
5
6
7
8
- (CGSize)preferredSize { CGFloat width = CGRectGetWidth(self.bounds); CGRect boundingRect = [self.text boundingRectWithSize:CGSizeMake(width, CGFLOAT_MAX) options:NSStringDrawingUsesLineFragmentOrigin context:nil]; CGSize size = CGSizeMake(ceil(width), ceil(CGRectGetHeight(boundingRect))); return size; }
由于 CATextLayer 布局逻辑似乎和 NSAttributedString 计算逻辑不一致,如果仅仅使用这个方法计算出来的高度回缺一部分,可能导致了我在做 Demo 的时候遇到文字高度不足内容被裁切的 bug。这些都是由于无法完整控制 CATextLayer 布局结果导致的。反观 TextKit 和 CoreText 就让人感觉很舒服,你可以获取每一个 fragment 的 frame,甚至可以获得每一个字所的 frame / path。让排版精确可控(当然代码量也会更多)
TextKit 使用 TextKit 的好处在于你既可以享受 UITextView 给你带来的一切封装(键盘输入、渲染、排版、工具栏……),又可以直接服用其提供的排版结果进行绘制。
ps:多线程使用请参考TextKit 的线程安全 ,不要直接拿 UITextView 私有的 NSLayoutManager 来用。
在合适的时候在主线程上把 UITextView 的属性拷贝一份
1
2
3
4
5
6
7
8
9
10
11
12
13
14
15
16
17
18
- (void)updateRenderWithTextView:(UITextView *)textView { [self.lock lock]; NSTextContainer *textContainer = textView.textContainer; NSTextContainer *innerTextContainer = self.textContainer; innerTextContainer.size = textContainer.size; innerTextContainer.maximumNumberOfLines = textContainer.maximumNumberOfLines; innerTextContainer.lineBreakMode = textContainer.lineBreakMode; innerTextContainer.lineFragmentPadding = textContainer.lineFragmentPadding; innerTextContainer.exclusionPaths = textContainer.exclusionPaths; // copy textView attr to storage NSTextStorage *storage = self.textStorage; NSAttributedString *attributedText = textView.attributedText; [storage replaceCharactersInRange:NSMakeRange(0, storage.length) withAttributedString:attributedText]; [self.lock unlock]; }
大小计算
1
2
3
4
5
6
- (CGSize)preferredSize { NSRange range = [self glyphRange]; CGRect rect = [self.layoutManager boundingRectForGlyphRange:range inTextContainer:self.textContainer]; return rect.size; }
绘制
1
2
3
4
5
- (UIImage *)image { UIGraphicsBeginImageContextWithOptions(self.textView.bounds.size, NO, [UIScreen mainScreen].scale); [self.layoutManager drawGlyphsForGlyphRange:[self glyphRange] atPoint:CGPointZero]; return UIGraphicsGetImageFromCurrentImageContext(); }
CoreText 从下面代码其实可以看出 CoreText 的使用会比其他代码都繁琐并且复杂一些,并且 CoreText 是左下角坐标系与 UIKit 左上角坐标系不同会给第一次使用者造成学习成本。
大小计算&绘制
1
2
3
4
5
6
7
8
9
10
11
12
13
14
15
16
17
18
19
20
21
22
23
24
25
- (CGSize)preferredSize { CGFloat width = CGRectGetWidth(self.bounds); CGRect rect = CGRectMake(0, 0, width, CGFLOAT_MAX); CTFramesetterRef framesetterRef = CTFramesetterCreateWithAttributedString((CFAttributedStringRef)self.text); CGSize size = CTFramesetterSuggestFrameSizeWithConstraints(framesetterRef, CFRangeMake(0, self.text.length), nil, rect.size, nil); CGPathRef framePath = [UIBezierPath bezierPathWithRect:(CGRect){CGPointZero, size}].CGPath; CTFrameRef frameRef = CTFramesetterCreateFrame(framesetterRef, CFRangeMake(0, self.text.length), framePath, NULL); self.frameRef = frameRef; CFRelease(framesetterRef); return size; } - (UIImage *)image { CGRect rect = self.bounds; UIGraphicsBeginImageContextWithOptions(rect.size, NO, [UIScreen mainScreen].scale); CGContextRef ctx = UIGraphicsGetCurrentContext(); CGContextTranslateCTM(ctx, 0, rect.size.height); CGContextScaleCTM(ctx, 1.0, -1.0); CTFrameDraw(self.frameRef, ctx); UIImage *image = UIGraphicsGetImageFromCurrentImageContext(); return image; }
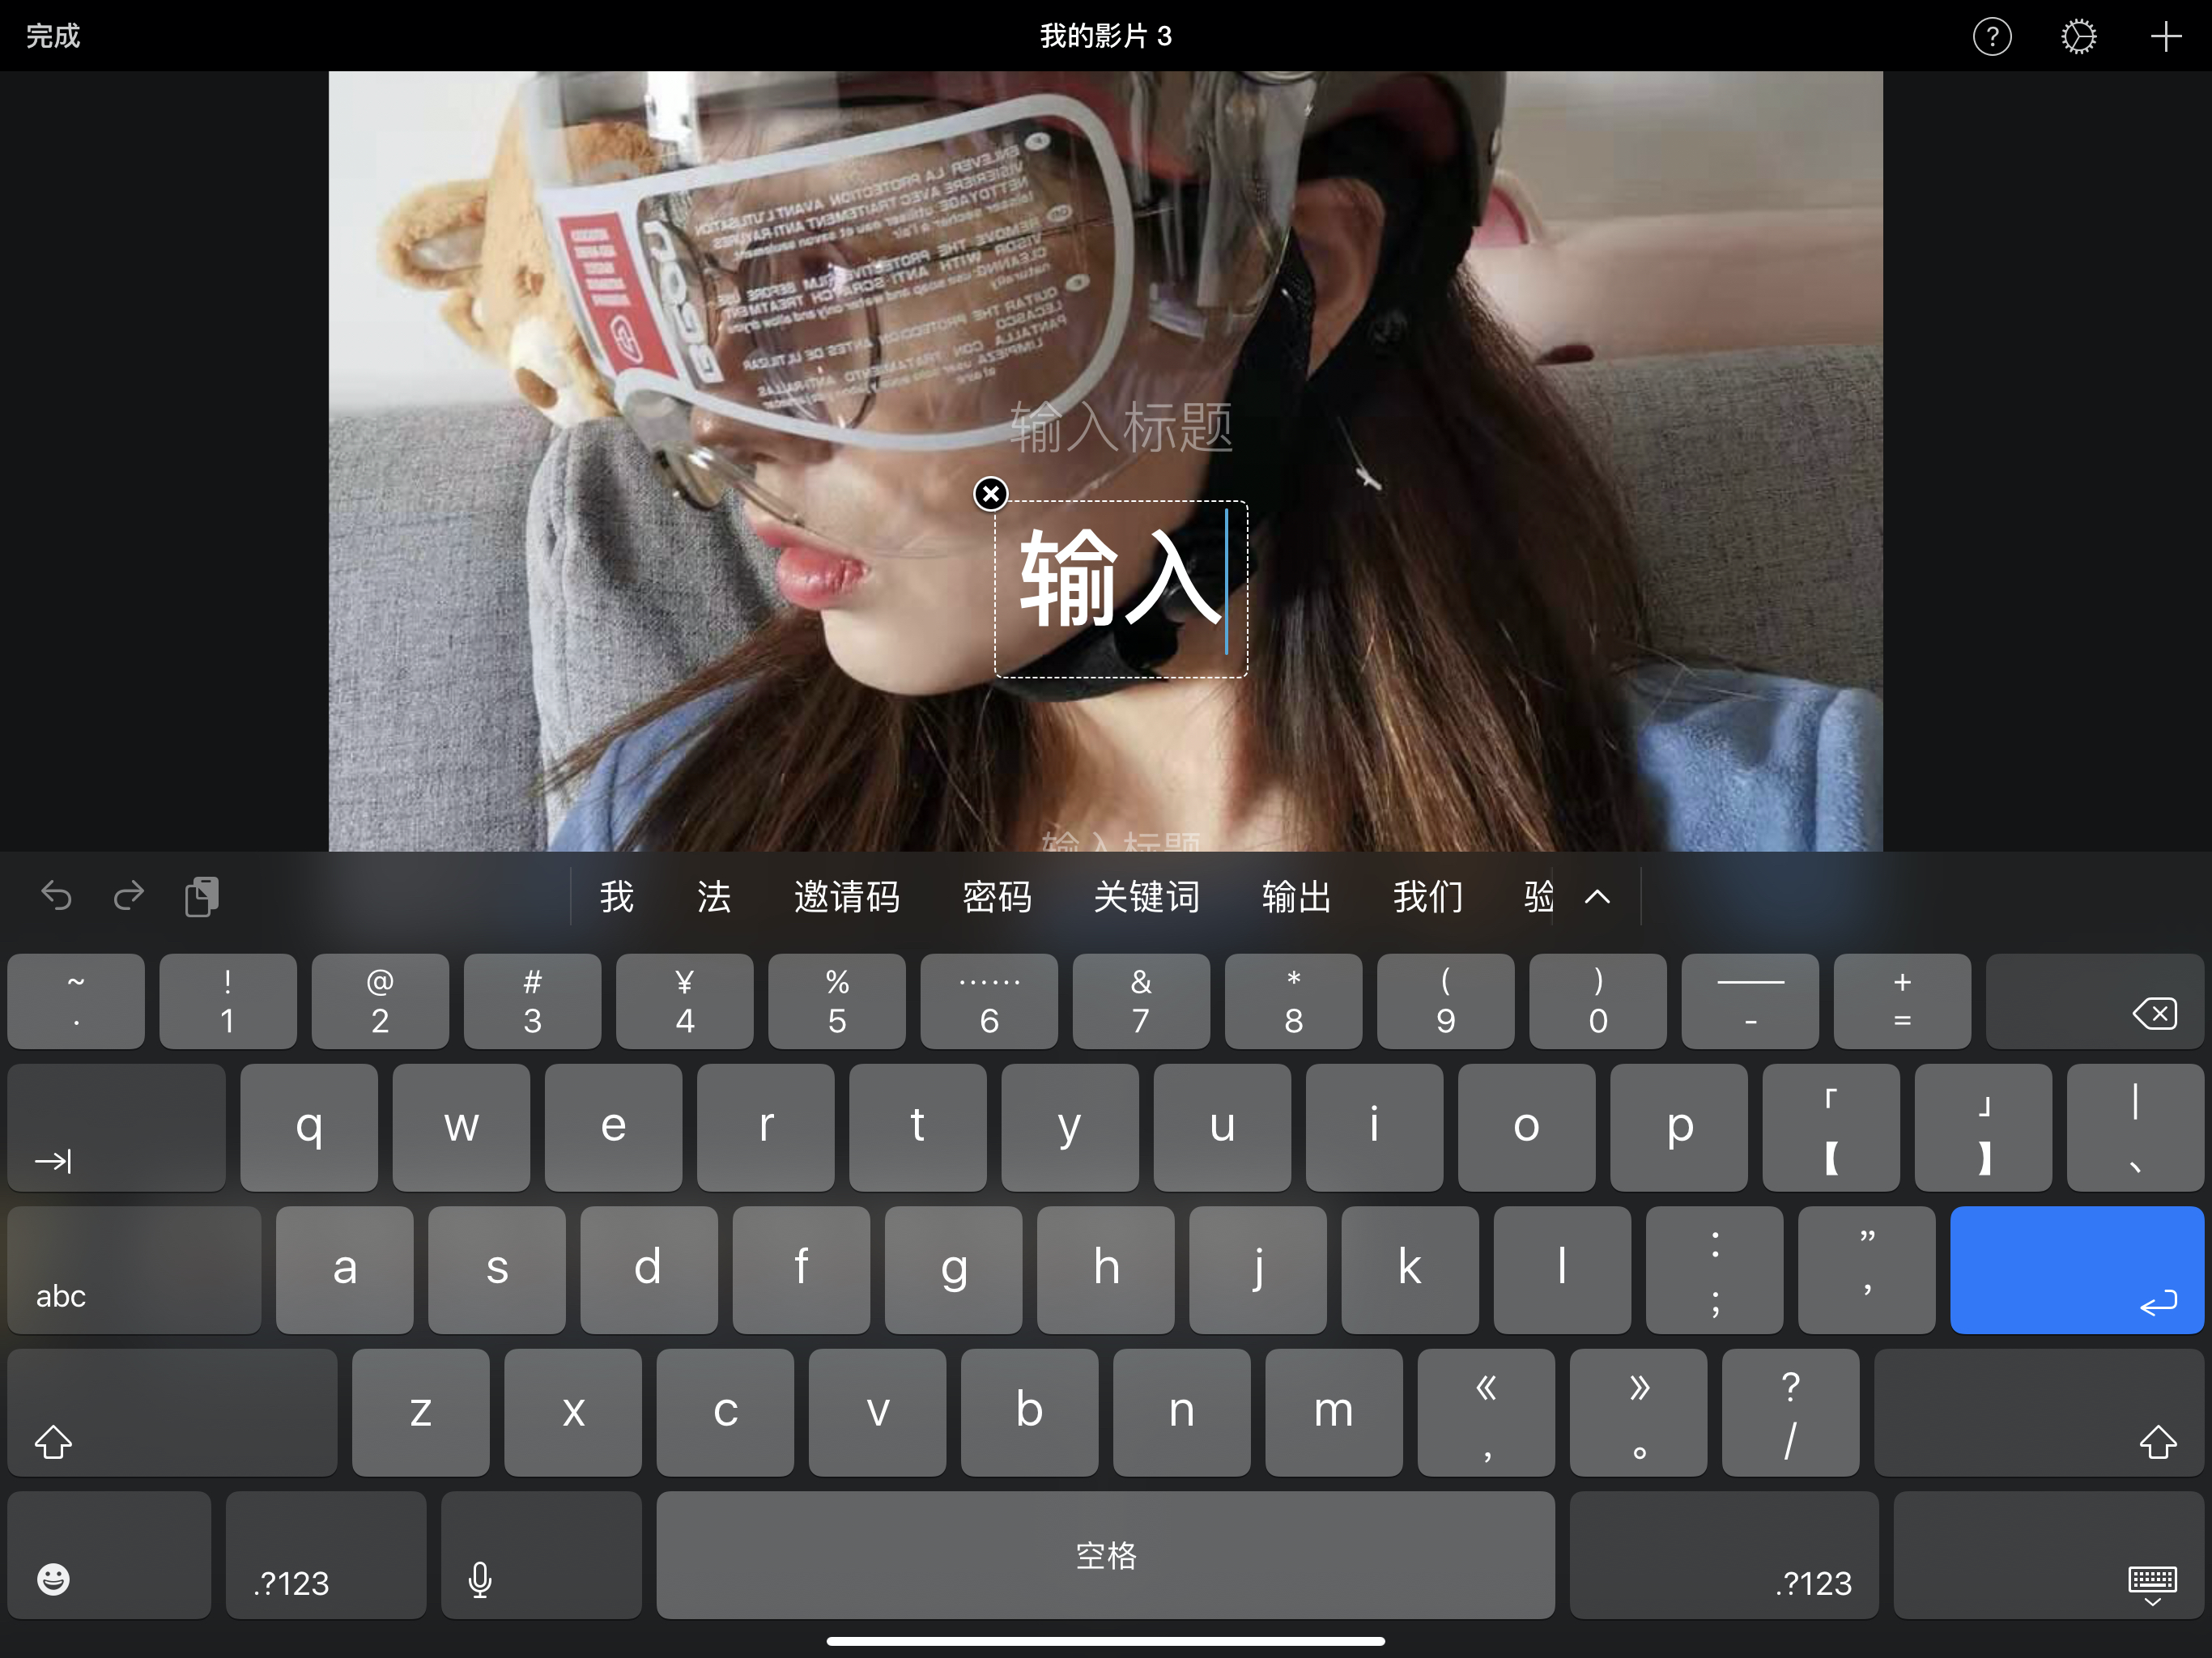
封装渲染组件 剪映 以及 快影 的交互 UI,视频文字贴纸上其实是没有光标的。类似 iMovie 的添加文字输入形式其实是更符合预期的。
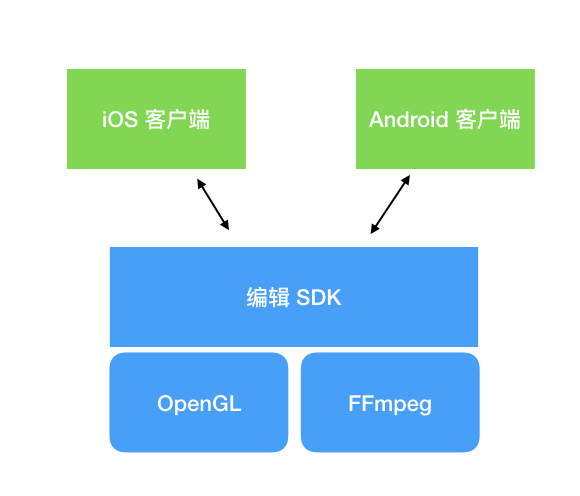
客户端视频渲染大致框架一般会是这样,iOS 和 Android 客户端通过接入 sdk 的形式集成视频编辑能力。之前提到过要实现将文字渲染到视频上必须创建出位图与视频画面合成,文字渲染逻辑由 客户端 实现还是 SDK 面临了抉择。
客户端渲染 or SDK 渲染 两种实现方式主要的分歧点在于文字的渲染由 客户端 实现还是 SDK 实现
客户端实现
用户交互性能最优,实现代码逻辑少
双端都提供了丰富的基础组件可以保证输入逻辑、移动拖拽逻辑快速搭建。
可以不用写 OpenGL 相关的代码,双端都提供了类似的文字排版框架——OpenGL 就比较麻烦。
SDK 实现
文字输入相关的功能依旧需要上层输入组件支持。
一套代码写完以后双端都可以使用,大大降低了接入层的代码量,符合中台思想,让 SDK 的功能更加强大。
如果觉得拖动时候用户的体验不佳,可以在拖动的过程中提升视频的帧率。
显而易见可以得出——如果你作为一家短视频大厂,让 SDK 去实现渲染文字收益比更高一些。因为当你尝试让客户端 实现类似于 剪映 的动画——每个文字一个接一个从屏幕外飞入的屏幕内的指定位置时,显然你会被逼疯的。
如果你期望看完本文能实现类似的效果可能就会让你失望了,因为 剪映 的文字动画是在视频导出 的过程中实现文字动画的计算的,很可惜我并不擅长这块的实现——让我用 AVVideoComposition 实现简单的动画到还可以。
在研究剪映的实现过程中有一个极大的优点吸引了我:无损的缩放&流畅的体验 。
客户端如何实现无损缩放并且优化内存使用 首先列举一下制作视频的原材料
1920x1080 视频一个
视觉给出了一张文字贴纸视觉稿,字体大小为36号字,一行7个字
预览分辨率&导出分辨率
在编辑的过程中,视频的预览分辨率可以适当小于视频尺寸(优化编辑过程性能),只需要在导出的时候保证视频的允许与视频原始分辨率相同即可。
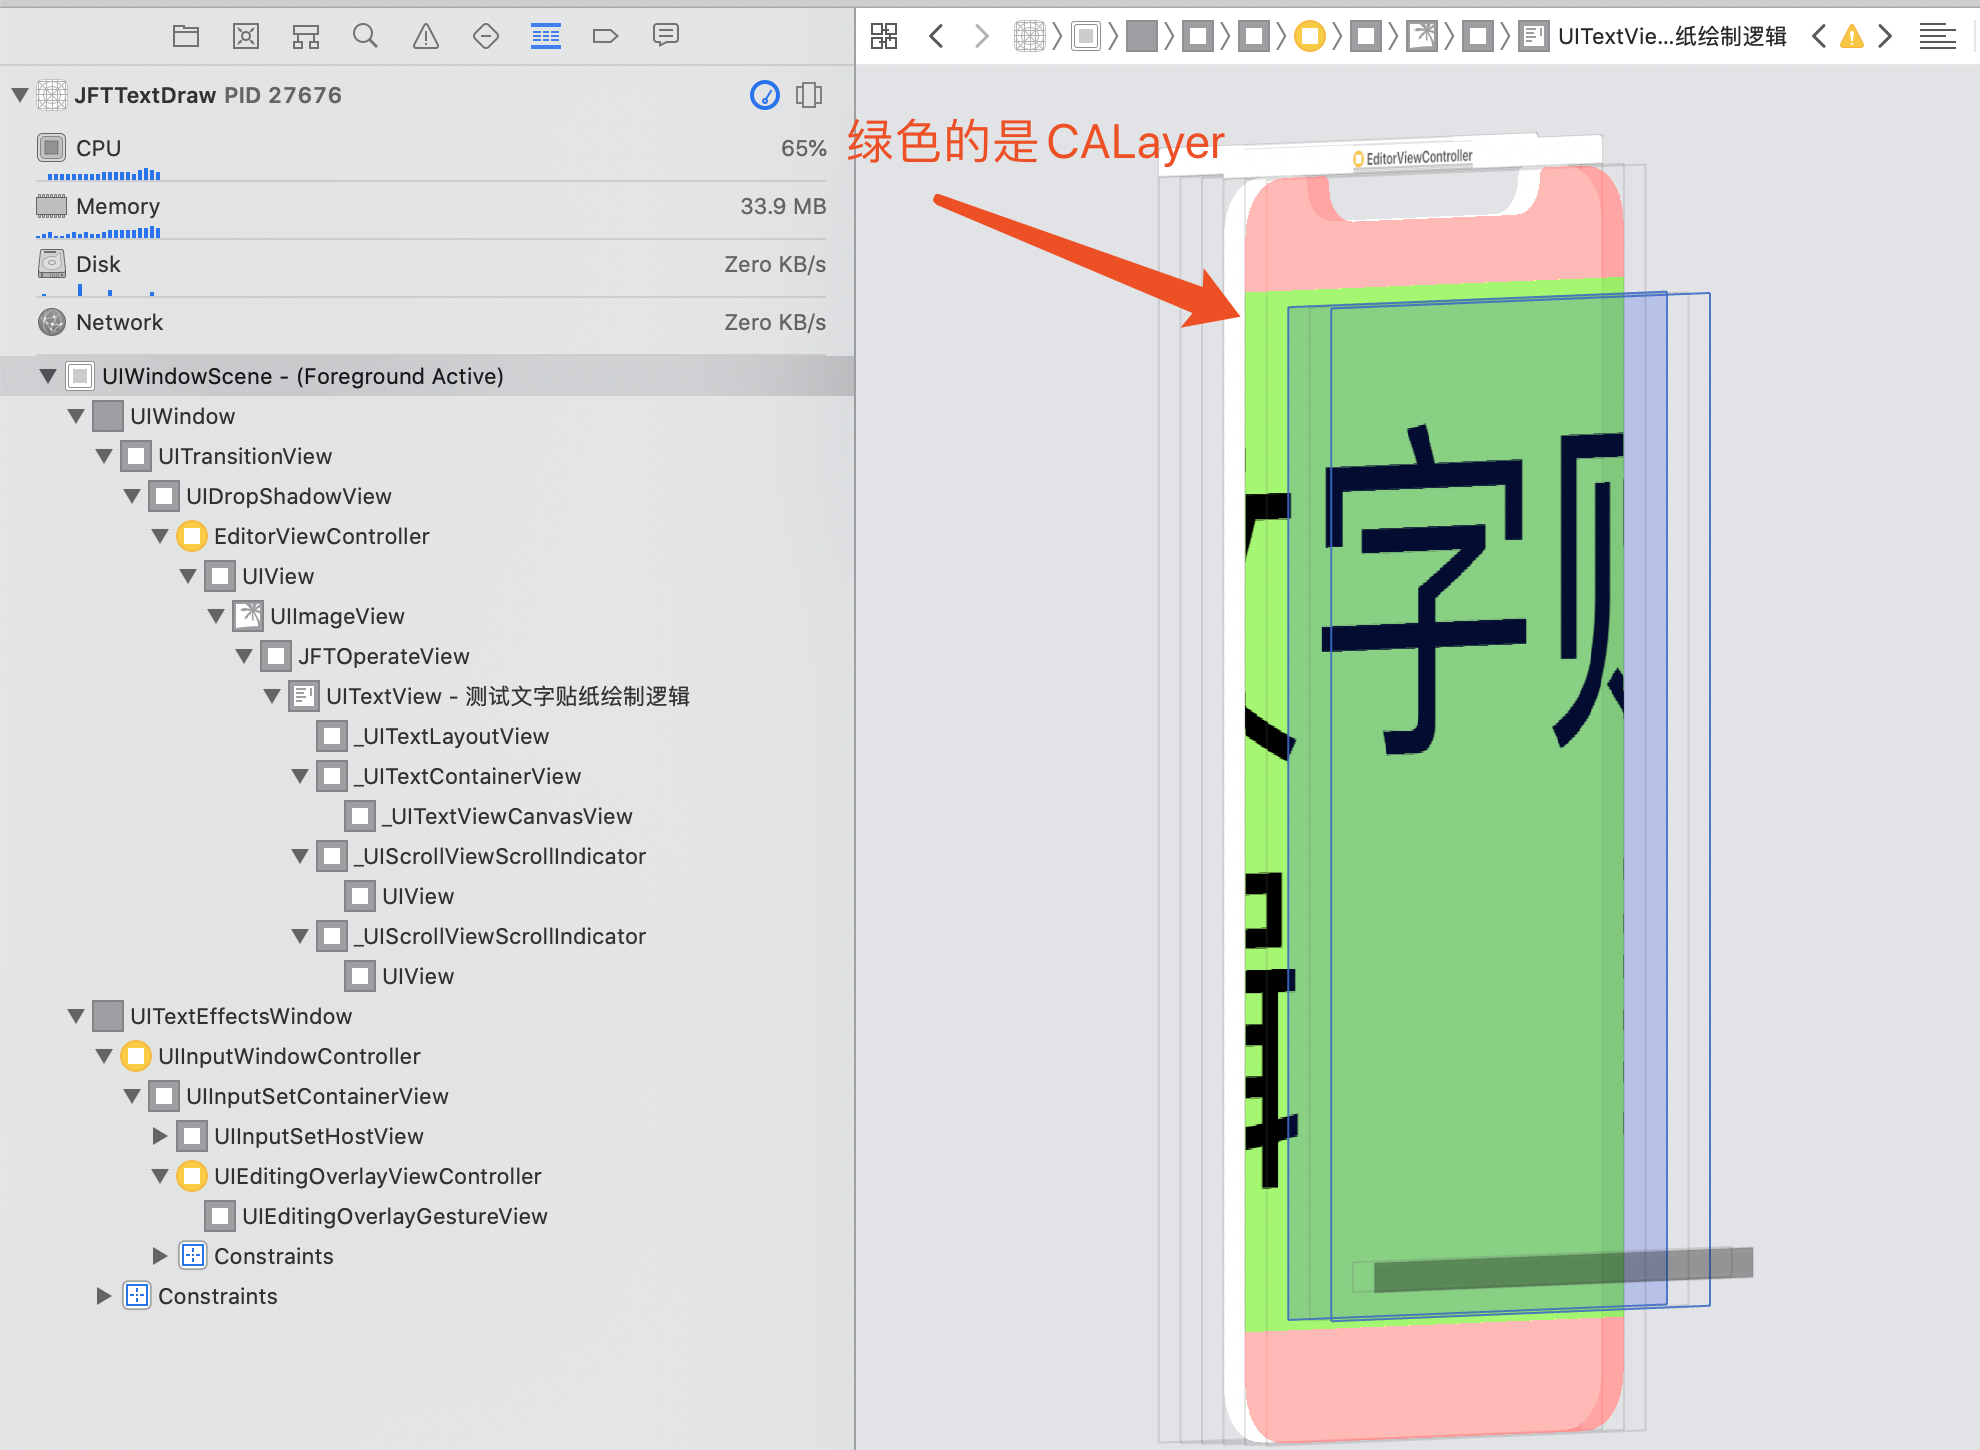
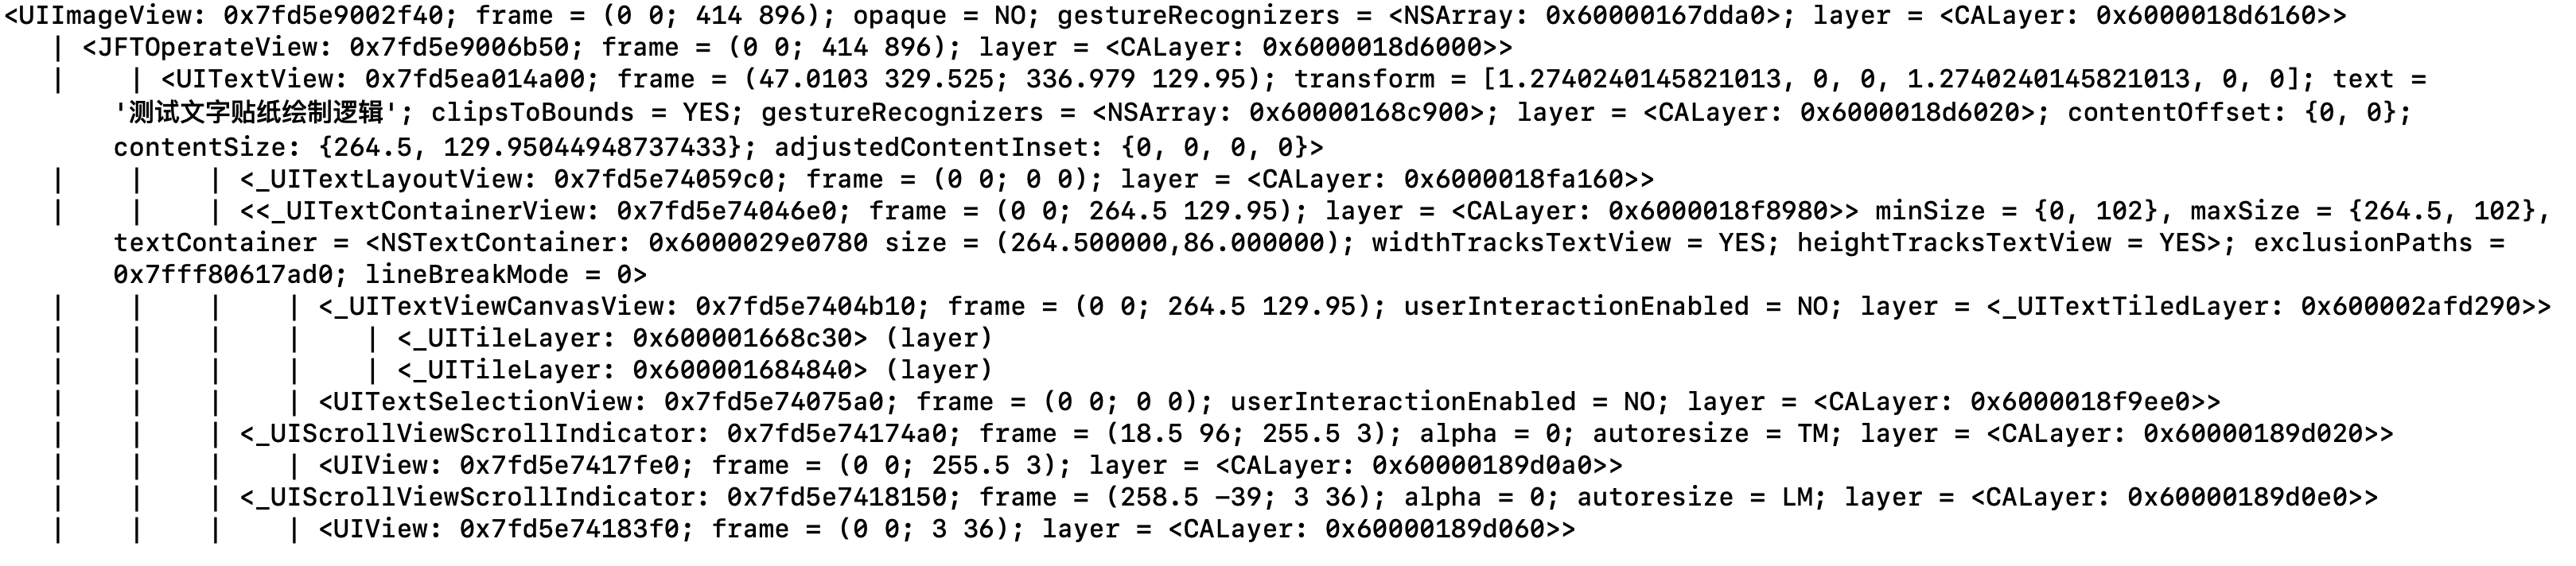
ImageView 代表播放器
JFTOperateView 是容器,贴在播放器上,用来承载 文字贴纸 所在 Layer
UITextView 提供键盘输入,文字颜色透明(我们只要个光标)
框架的选用上,使用 TextKit 进行文字绘制
1
2
3
4
5
6
7
8
9
if (self.strokeJoinRound) { CGContextSetTextDrawingMode(ctx, kCGTextStroke); CGContextSetLineJoin(ctx, kCGLineJoinRound); } if (!self.hidden) { [self.layoutManager drawGlyphsForGlyphRange:NSMakeRange(0, self.layoutManager.numberOfGlyphs) atPoint:self.textPoint]; }
CALayer 的大小等于 1920x1080,设置 transform 保证其能够短边撑满,得到 scaleAspectFit 一样的效果。
1
2
3
4
5
6
7
8
9
10
11
12
13
14
15
16
17
18
- (void)layoutSublayersOfLayer:(CALayer *)layer { [super layoutSublayersOfLayer:layer]; CGSize previewSize = layer.bounds.size; self.project.previewSize = previewSize; CGFloat xScale = projectXScale(self.project); CGFloat yScale = projectYScale(self.project); CGFloat scale = MIN(xScale, yScale); self.testLayer.project = self.project; self.testLayer.defaultScale = 1 / scale; self.testLayer.bounds = (CGRect){CGPointZero, self.project.exportSize}; self.testLayer.position = CGPointMake(CGRectGetWidth(layer.bounds) / 2.0, CGRectGetHeight(layer.bounds) / 2.0); self.testLayer.transform = CATransform3DMakeScale(scale, scale, 1); …… }
将文字渲染到视频上的代码可以参照下面
1
2
3
4
5
6
UIGraphicsBeginImageContextWithOptions(exportSize, NO, 1); { [self.operateView renderToContext:UIGraphicsGetCurrentContext()]; self.playerView.image = UIGraphicsGetImageFromCurrentImageContext(); } UIGraphicsEndImageContext();
在 Demo 中,我使用了一个 CADisplayLink 用来模拟视频的渲染。当手势开始触发时,开启不停刷新,不断将更新位置、缩放、旋转信息之后的文字图像渲染成一张图,提交给 UIImageView 进行展示。可以发现缩放N倍以后,内存占用依旧很低。
次优解 在此之前我其实尝试过其他的解决方案:创建一个 和 UITextView 一般大的 Layer,在缩放过程中不断递归调用调整所有 layer.contentsScale 使其足够清晰。
1
2
3
4
5
6
7
8
9
10
11
12
13
14
15
16
17
18
19
20
21
22
23
24
25
26
27
28
29
30
31
32
@implementation UIView (Scale) - (void)updateForZoomScale:(CGFloat)zoomScale { CGFloat screenAndZoomScale = zoomScale * [UIScreen mainScreen].scale; // Walk the layer and view hierarchies separately. We need to reach all tiled layers. [self applyScale:screenAndZoomScale toView:self]; [self.layer updateForZoomScale:screenAndZoomScale]; } - (void)applyScale:(CGFloat)scale toView:(UIView *)view { view.contentScaleFactor = scale; for (UIView *subview in view.subviews) { [self applyScale:scale toView:subview]; } } @end @implementation CALayer (Scale) - (void)updateForZoomScale:(CGFloat)zoomScale { [self applyScale:zoomScale toLayer:self]; } - (void)applyScale:(CGFloat)scale toLayer:(CALayer *)layer { layer.contentsScale = scale; for (CALayer *sublayer in layer.sublayers) { [self applyScale:scale toLayer:sublayer]; } } @end
好处
UITextView 和文字 Layer 层之间的坐标系转化会略微简单一些
当缩放系数没有那么大的时候,移动过程中无需重新绘制
坏处
缩放需要对内容进行重绘,缩放系数越大,占用内存越多
当涉及到文字贴纸需要多层文字描边叠加才能展示的时候,需要对图层进行合并以减少性能开销
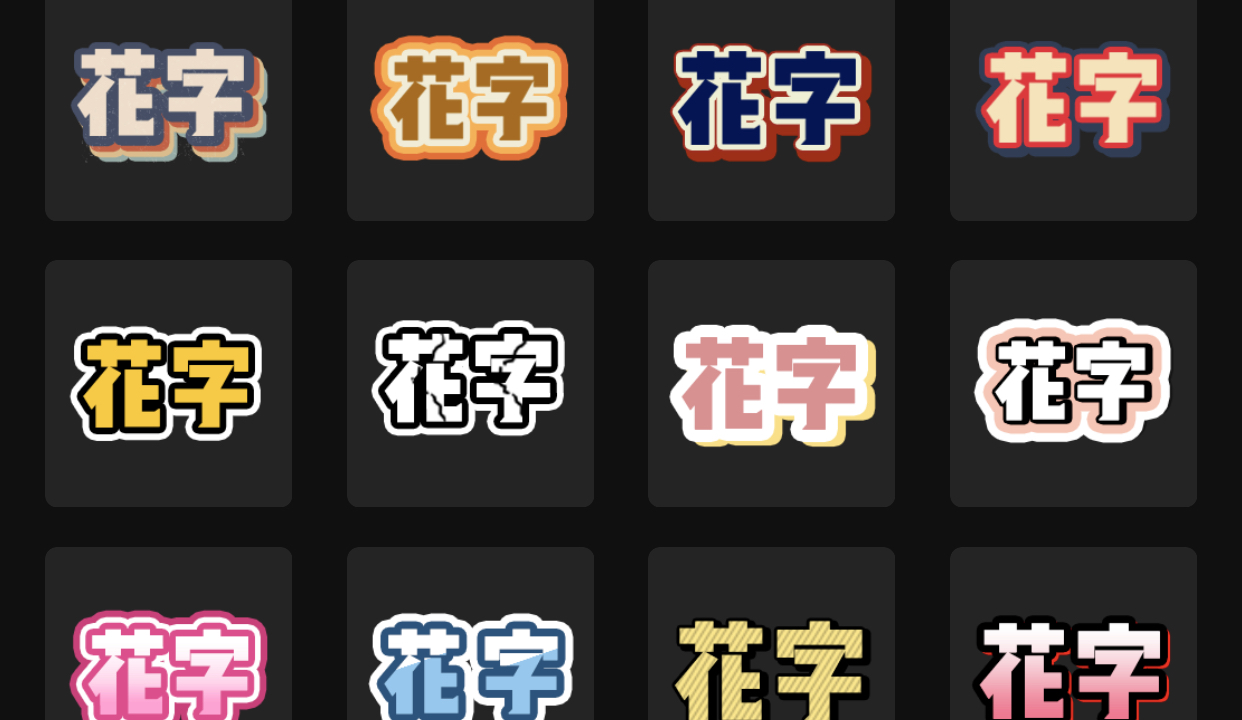
下图展示了剪映的花字,大部分是需要将同一个文字调整参数:描边粗细、填充颜色、偏移量 ,图层叠加实现的。